First of all, I want to say that the cake turned out great. It was all I was hoping for (even if not absolutely perfect). Because the picture is worth a thousand words, here it is:

Fall Basket Cake
Now come the thousand words! This cake was a lot of work (even if it was the work of love). For those who might want to try to walk in my steps, I want to share the story in detail.
Challenge 1 – Fondant Leaves
First of all, I decided to make the fondant leaves, obvious reason being the time it takes for them to dry, but also my lack of experience working with this medium. I had some MMF in the fridge, so I colored it using gel food colors (mostly yellow, a little bit of red). To make the leaves, I got a cookie cutter set like this

For the first batch I got some green florist wires and inserted them as stems (what was I thinking? they weren’t going to be a part of any bouquet…) Of course, the leaves dried flat and boring, not to mention the wire in the middle made them brittle like hell. For the second batch I just cut out the leaves, rolled them with a ball tool somewhat thinner (I couldn’t get them really thin and realistic – for this I’d need me some gumpaste), veined (handwork! I still need to buy myself some veiners) and put them on crimpled aluminum foil to dry.
To color the dried leaves, I used non-toxic chalk and food color felt-tip pens. All in all, I was happy with the way the leaves turned out, although as I already said, I need to explore gumpaste!
Here’s the close-up of the leaves

Challenge 2 – Basket Handle
This one was a real pickle! I first wanted to make the handle out of the fondant. Which I did – not one, but THREE! Let me tell you, it wasn’t pretty – either there’s something wrong with my fondant (which was homemade marshmallow variety) or with my humble self, but the silly thing was sticking and breaking and overall not behaving itself. After I managed to make three handles, I left them to dry – which they refused to do! I waited 4 days, after which I was trying to find the way to make them dry better. Long story short, they broke. Yes, all of them.
I had to get creative and find the express way to make a better and stronger handle (preferably, also edible). I finally bought some flaky pastry, cut slim strips and braided them, put toothpicks in the ends and baked the handle, praying it would work! I guess some baking gods out there took a pity on me, because it worked and worked beautifully. The handle was the right color, right form, and even had a bit of a give. It also tasted good (and was eaten by Gleb who liked it more than the cake it was attached to).
Challenge 3 – Cake
Actually, this part was no challenge at all! I chose to make Russian Multilayered Honey Cake which I absolutely love. Well, it was a challenge for me to make first 10 or so times I attempted it, but after tons of trial and errow I finally found a perfect recipe, so this time around I was sure it would turn out perfect, which it did! I’ll put up the recipe in the recipe section the first chance I get (need to translate it first).

Challenge 4 – Icing on a Cake
I wanted to use Dulce de Leche buttercream to pipe the basketweave on a cake. It tastes great, but there’s one problem with it – it just won’t hold shape! The recipe I know of (equal parts of dulce de leche and butter, beat together) is usually used as a cake filling. I tried to find a recipe used specifically for piped decorations that would use dulce de leche, and found one. It was much more complicated to make, but the consistancy was still too soft and runny to pipe anything.
I had to improvise yet again, so I added some gelatin to the cream, which did the trick! I wouldn’t say the frosting had the perfect consistancy, but it worked.
Challenge 5 – Piped Decorations
So, I had my frosting, but there was still a lot of piping to do. What’s so challenging about that? Nothing, I guess, if you’ve done it before. I didn’t, so I was plenty anxious. I knew the principle behind it, and I watched some YouTube videos like this one
As I said earlier, my frosting wasn’t optimal. So, considering that and the fact that it was my first time piping anything, I think I did good. Here’s what it looked like:

Challenge 6 – Mushrooms
This was another thing that took tons of my precious time. The idea was to use meringue for a stem and a cookie for a top, which was exactly what I did. Only my meringue didn’t want to hold stiff peaks for some reason (this never happened before), so my stems didn’t want to stay tall and proud as they should have. I ended up doing them in two takes: piping small ones first, and then adding another layer after they dried a bit in the oven. This made for some very funny looking stems, but it worked.
The recipe for the cookie used the leftover egg-yolk from making a meringue. Maybe because of this, maybe because of my pure luck, the cookies were very brittle and I broke more than I was able to save. I ended up having only 8 or 9 usable mushrooms, but it was enough to fill the basket, so no big damage done! May I also add that the kids went crazy over these little forest suckers!

All in all, the cake was A LOT of work, but at least I was happy with an outcome. It was, of course, absolutely delicious, but it also looked beautiful. The biggest compliment I could get came from one of the guests, who thought it was a real basket up to the point when I started cutting the cake. She was really surprised! Sliced basket for desert, anybody?
To finish off my novel (sorry if it was too much information, but I just needed to share), here are a couple more pictures:


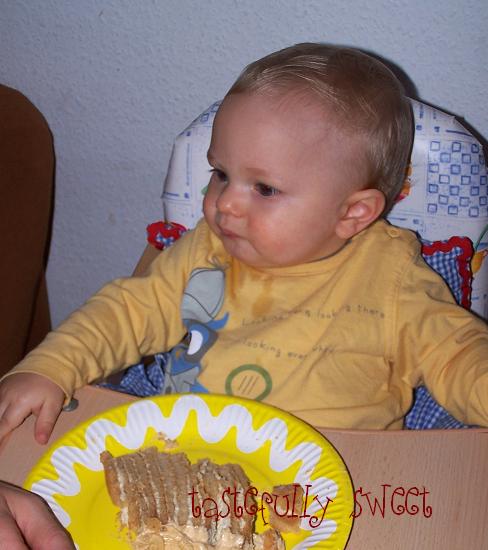
Oh, how could I forget the happy birthday boy? He had his cake and ate it too!

